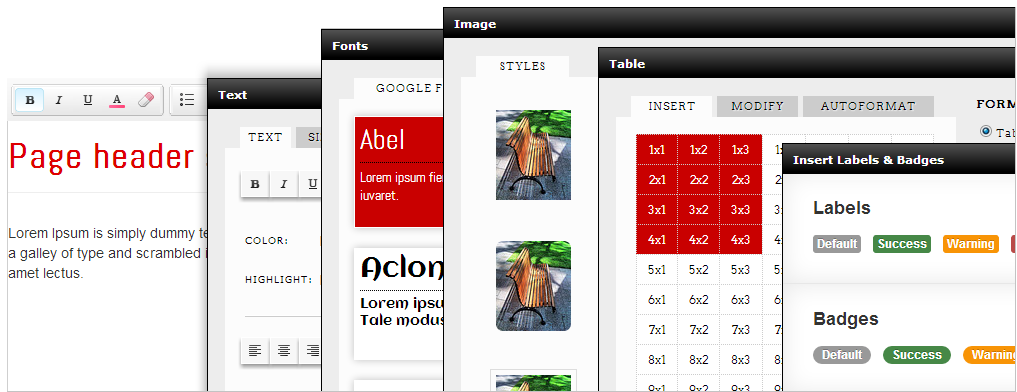
Bootstrap Live Editor
A WYSIWYG Editor built for Bootstrap. It offers a nice and elegant way to edit and beautify html with Bootstrap ready content/snippets.
The Editor is based on InnovaStudio's Editor (www.innovastudio.com), and specially customized for Bootstrap framework.
Use it in as many as website projects. Unlimited website license!.
Quick Start
The Editor can be used to replace <textarea> or <div> element.
Files to reference:
<script src="scripts/common/jquery-1.7.min.js" type="text/javascript"></script>
<script src="scripts/innovaeditor.js" type="text/javascript"></script>
<script src="scripts/innovamanager.js" type="text/javascript"></script>
Usage:
<textarea id="txtContent" rows="4" cols="30">

<script type="text/javascript">
    $(document).ready(function () {
        $('#txtContent').liveEdit({
            css: ['bootstrap/css/bootstrap.min.css', 'bootstrap/bootstrap_extend.css'] /* Apply bootstrap css into the editing area */ ,
            groups: [
                    ["group1", "", ["Bold", "Italic", "Underline", "ForeColor", "RemoveFormat"]],
                    ["group2", "", ["Bullets", "Numbering", "Indent", "Outdent"]],
                    ["group3", "", ["Paragraph", "FontSize", "FontDialog", "TextDialog"]],
                    ["group4", "", ["LinkDialog", "ImageDialog", "TableDialog", "Emoticons", "Snippets"]],
                    ["group5", "", ["Undo", "Redo", "FullScreen", "SourceDialog"]]
                    ] /* Toolbar configuration */
        });
        $('#txtContent').data('liveEdit').startedit(); /* Run the Editor */
    });
</script>
You can get/read the generated HTML content using:
$('#content').data('liveEdit').getXHTMLBody();
To get full HTML content, use:
$('#content').data('liveEdit').getXHTML();
Content Publishing
When you display/publish your content result anywhere on your web sites, please include the following:
1. Bootstrap Framework.
<link href="bootstrap/css/bootstrap.min.css" rel="stylesheet" type="text/css" />
<link href="bootstrap/css/bootstrap-responsive.min.css" rel="stylesheet" type="text/css" />
2. Google Font integration scripts.
<script src="scripts/common/jquery-1.7.min.js" type="text/javascript"></script>
<script src="http://ajax.googleapis.com/ajax/libs/webfont/1/webfont.js" type="text/javascript"></script>
<script src="scripts/common/webfont.js" type="text/javascript"></script>
Stylesheets
To apply stylesheets to the Editor:
$('#txtContent').liveEdit({
    css: ['bootstrap/css/bootstrap.min.css', 'bootstrap/bootstrap_extend.css']
    });
The above example applies Bootstrap framework and additional css to the Editor.
Buttons Configuration
To configure buttons:
$('#txtContent').liveEdit({
    groups: [
            ["group1", "", ["Bold", "Italic", "Underline", "ForeColor", "RemoveFormat"]],
            ["group2", "", ["Bullets", "Numbering", "Indent", "Outdent"]],
            ["group3", "", ["Paragraph", "FontSize", "FontDialog", "TextDialog"]],
            ["group4", "", ["LinkDialog", "ImageDialog", "TableDialog", "Emoticons", "Snippets"]],
            ["group5", "", ["Undo", "Redo", "FullScreen", "SourceDialog"]]
            ]
});
Below are the list of available buttons:
- Bold
- Italic
- Underline
- Strikethrough
- Superscript
- Subscript
- ForeColor
- BackColor
- RemoveFormat
- Paragraph
- FontName
- FontSize
- FontDialog
- TextDialog
- CompleteTextDialog
- Quote
- JustifyLeft
- JustifyCenter
- JustifyRight
- JustifyFull
- Bullets
- Numbering
- Indent
- Outdent
- TableDialog
- FlashDialog
- LinkDialog
- ImageDialog
- YoutubeDialog
- CharsDialog (Special Characters Dialog)
- SearchDialog
- SourceDialog (HTML Editor Dialog)
- Emoticons
- Line
- CustomTag
- Undo
- Redo
- FullScreen
- BRK (Line Break)
Using File Browser
The package contains a sample & ready to use File Browser. If enabled, can be used directly from Image & Link dialog.
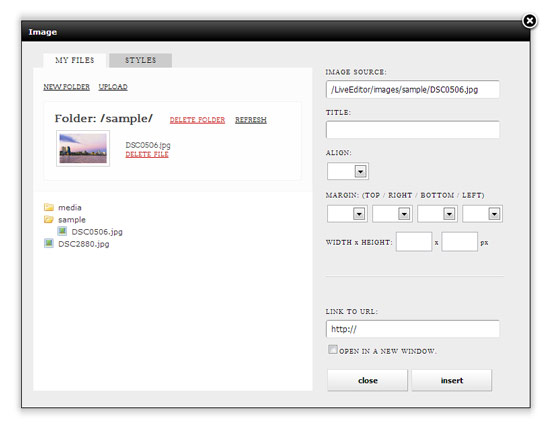
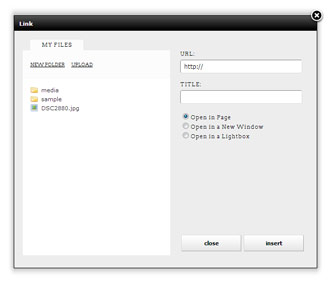
To enable custom file browser in the Image & Link dialogs:
$('#txtContent').liveEdit({
    fileBrowser: '/assetmanager/asset.php'
    });
Or
$('#txtContent').liveEdit({
    fileBrowser: '/assetmanager/asset.aspx'
    });
To specify folder location to browse, set the base variable (in asset.php, asset.asp or asset.apsx):
var base = "/images";
To disable the Upload & Delete files and Create & Delete folders features, set the readonly variable to true (in asset.php, asset.asp or asset.apsx):
var readonly = true;
Some applications require File Browser that returns full file path (eg. in Newsletter editing, etc). To enable full file path feature, set the fullpath variable to true (in asset.php, asset.asp or asset.apsx):
var fullpath = true;
Custom Buttons
You can add your own custom buttons:
$('#txtContent').liveEdit({
    arrCustomButtons: [
            ["MyCustomButton1", "alert('Custom Command here..')", "Caption..", "btnCustom1.gif"],
            ["MyCustomButton2", "alert('Custom Command here..')", "Caption..", "btnCustom2.gif"]
            ],
    groups: [
            ["group1", "", ["Bold", "Italic", "Underline", "ForeColor", "RemoveFormat"]],
            ["group2", "", ["Bullets", "Numbering", "Indent", "Outdent"]],
            ["group3", "", ["Paragraph", "FontSize", "FontDialog", "TextDialog"]],
            ["group4", "", ["LinkDialog", "ImageDialog", "TableDialog", "Emoticons", "MyCustomButton1", "MyCustomButton2"]],
            ["group5", "", ["Undo", "Redo", "FullScreen", "SourceDialog"]]
            ]
    });
Button image file is located in scripts/icons/ folder. Use btnCustom1.gif, btnCustom2.gif, .. or create your own button image.
Custom Tags
With this feature, you can insert predefined custom tags into the current Editor content. Custom Tag insertion is a feature that is commonly used in mailing applications or template editing in web content management systems.
$('#txtContent').liveEdit({
    groups: [
            ["group1", "", ["Bold", "Italic", "Underline", "ForeColor", "RemoveFormat"]],
            ["group2", "", ["Bullets", "Numbering", "Indent", "Outdent"]],
            ["group3", "", ["Paragraph", "FontSize", "FontDialog", "TextDialog"]],
            ["group4", "", ["LinkDialog", "ImageDialog", "TableDialog", "Emoticons", "CustomTag"]],
            ["group5", "", ["Undo", "Redo", "FullScreen", "SourceDialog"]]
            ],
    arrCustomTag: [
            ["First Name", "[%FIRSTNAME%]"],
            ["Last Name", "[%LASTNAME%]"],
            ["Email", "[%EMAIL%]"]
            ]
});
Custom Dialog for Inserting HTML Content
It is possible to use custom button to open a custom dialog, and from the dialog you can insert custom HTML into the editor.
$('#txtContent').liveEdit({
    arrCustomButtons: [
            ["MyCustomButton", "modalDialog('my_custom_dialog.htm')", "Caption..", "btnCustom1.gif"]
            ],
    groups: [
            ["group1", "", ["Bold", "Italic", "Underline", "ForeColor", "RemoveFormat"]],
            ["group2", "", ["Bullets", "Numbering", "Indent", "Outdent"]],
            ["group3", "", ["Paragraph", "FontSize", "FontDialog", "TextDialog"]],
            ["group4", "", ["LinkDialog", "ImageDialog", "TableDialog", "Emoticons", "MyCustomButton"]],
            ["group5", "", ["Undo", "Redo", "FullScreen", "SourceDialog"]]
            ]
    });
The above example opens my_custom_dialog.htm. From this page, to insert custom HTML:
var sHTML = "<p>Best Wishes</p>";
var obj = parent.oUtil.obj;
obj.insertHTML(sHTML);
Loading Content at Runtime
To load content at runtime:
$('#txtContent').data('liveEdit').putHTML(sHTML);
where sHTML is the full HTML content. Note that putHTML() will also replace the current content style (defined by css property).
To load HTML Body content:
$('#txtContent').data('liveEdit').loadHTML(sHTML);
where sHTML is the HTML Body content.
Editing Mode
To enable full html editing, set mode property to "XHTML". The default value is "XHTMLBody" (for editing body content only).
$('#txtContent').liveEdit({
    mode: 'XHTML'
    });
Inserting <DIV>, <P> or <BR> when pressing Enter Key
You can configure the editor to insert <DIV>, <P> or <BR> when pressing enter key.
$('#txtContent').liveEdit({
    returnKeyMode: 1
    });
Possible values are:
- 0: follow browser default. With this option, tag inserted when pressing Enter key is depending on browser. IE8 and lower will insert P and IE9 insert DIV. Firefox always insert BR while Chrome/Safari inserts DIV.
- 1: always insert DIV
- 2: always insert BR
- 3: always insert P (default)
MS Word Cleaning & Paste Text
By default, when user paste content into editing panel (using CTRL+V), the editor will clean the content and remove any non html standard tags. This is particullary useful for paste content from other resource like MS Word.
However you can also configure editor to remove any html tags from content pasted into editor using pasteTextOnCtrlV property:
$('#txtContent').liveEdit({
    pasteTextOnCtrlV: true
    });
Using Basic Fonts & Disabling Google Fonts
To use basic font dropdown, add "FontName" to the buttons confguration:
$('#txtContent').liveEdit({
    groups: [
            ["group1", "", ["Bold", "Italic", "Underline", "FontName", "ForeColor", "RemoveFormat"]],
            ["group2", "", ["Bullets", "Numbering", "Indent", "Outdent"]],
            ["group3", "", ["Paragraph", "FontSize", "TextDialog"]],
            ["group4", "", ["LinkDialog", "ImageDialog", "TableDialog", "Emoticons", "Snippets"]],
            ["group5", "", ["Undo", "Redo", "FullScreen", "SourceDialog"]]
            ]
});
To hide Google Font dialog, remove "FontDialog" from the buttons confguration. If you do not use Google Fonts, then the following include files are not required (can be removed):
<script src="http://ajax.googleapis.com/ajax/libs/webfont/1/webfont.js" type="text/javascript"></script>
<script src="scripts/common/webfont.js" type="text/javascript"></script>
Localization
You can localize the Editor to be displayed in specific language by adding a language include file before all the required Editor includes, for example:
<script language="Javascript" src="scripts/language/da-DK/editor_lang.js"></script>
The current available language files are located in folder scripts/language/. If no language file specified, English version will be used.
Note:
- Most of the available translations are not complete yet.
- To translate the Editor into your language, open & edit language files in folder:
- scripts\language\
- scripts\common\language\
This is just a quick source view. You can use "HTML Editor" button  on the Editor toolbar to open the default source view with code coloring & formatting.