 :
:
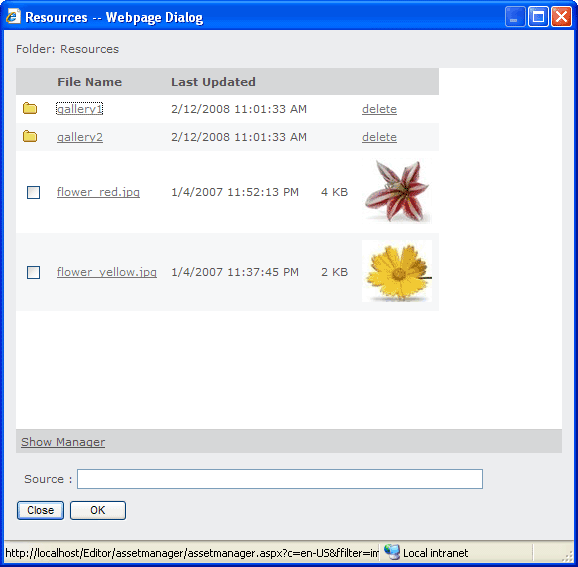
Included in the Editor is an Asset Manager add-on. Using the Asset Manager add-on, you can browse and manage your web assets (upload and delete files, create and delete folders). Asset Manager add-on is located in folder assetmanager. The main file is assetmanager.aspx. To enable the Asset Manager add-on:
If you enable the Asset Manager add-on, these dialogs will automatically show a Browse button
:
The Browse button will open the Asset Manager add-on dialog so that you can select a file which can be inserted as hyperlink or object (image, flash, video, etc).
If required, you can localize the Asset Manager add-on to be displayed in specific language by setting the c variable in querystring:
<editor:wysiwygeditor
Runat="server"
scriptPath="scripts/"
AssetManager="/assetmanager/assetmanager.aspx?c=de-DE"
AssetManagerWidth="570"
AssetManagerHeight="510"
ID="oEdit1" />
The current available values c variable are: da-DK (Danish), nl-NL (Dutch), fi-FI (Finnish), fr-FR (French), de-DE (German), zh-CHS (Chinese Simplified), zh-CHT (Chinese Traditional), nn-NO (Norwegian), es-ES (Spanish), sv-SE (Swedish). If lang variable is not specified, English version will be displayed.
The Asset Manager dialog will return the selected file url in the form of 'relative to root' path, for example:
/assets/image.gif
If required, it can be changed to return absolute path by setting bReturnAbsolute variable in assetmanager.aspx to true:
Private bUseAbsoluteUrl As Boolean = True
This will make the Asset Manager dialog returns:
http://yourservername/assets/image.gif
Inserting images using absolute path usually is required if you use the Editor in web-based email applications.